Monday, November 29, 2010

Our Mission, Part 2

...and now that the Mobile Journalism Tools section is up on Reynolds Journalism Institute's website, we are moving on to step two in our two-part mission statement. We are going to teach our peers and some of our journalism professors how to use these tools through our reviews and a help guide that we are in the middle of producing. It should be up by Wednesday, so check back for it then. Then, we are going to convince the journalism school faculty that mobile journalism should be incorporated into the curriculum.

To start off the week, we went to Jen Lee Reeves' broadcast capstone class and gave a brief presentation about the work we have done and offered them a chance to try the gear and applications we have experimented with all semester. On Wednesday, we are going to KOMU (the local NBC affiliate) and turning over our gear to the broadcast students on assignment that day. We will provide them the handout I mentioned earlier, a phone, a tripod, a microphone adapter and any other tools they might require. We will allow these students to test out the tools strictly from our guide, and we will shadow them to see their work (as well as be available to answer any questions). We have contacted Janet Saidi at KBIA (the local NPR affiliate) and are looking to do the same thing with her student reporters.

Next week, we have our final presentation in the form of a brown bag (faculty and students can bring their lunch and listen to our hour-long presentation). It is a little bigger than our last presentation (in terms of audience), but I am very excited to present our findings to a broad audience here at the j-school!

Saturday, November 27, 2010

Juice Bar Solar Charger

The Juice Bar Solar Charger holds a ton of power, holds it for a long time, and gives it out quickly. However, for all the good that it does, there are some negatives that go along with this particular charger that make me wary to suggest it to anyone.

Like several other external batteries we’ve tested, the Juice Bar charges via USB cord. It’s not a quick charge, but it’s not entirely too slow. Just don’t expect to have a full battery in an hour or two. You’ll need probably 4 hours of solid charging to get every bit out of this thing, which can be a long time to drain your computer, if that’s what you’re connecting to for charging purposes. It also has a solar panel on the top of the device. Like every other solar charger, it’s slow. However, it’s another way to charge, and it does make the power you put into your mobile device last longer, if you’re using your phone in sunlight.

Once it’s fully charged, however, the battery will keep filling up your phone for well over two hours of use. When I used it, my phone sat idle for only a few minutes, and it still took my iPhone from 20% battery to full.

Now we get into the drawbacks. Like many other devices we’ve tested, this is an external battery that has to be toted along with the mobile device. It’s attached via cable, giving you a little more leeway, but your phone is still tethered to the Juice Bar. Luckily, it’s slim and lightweight, otherwise this would be a serious issue. However, this isn’t my biggest problem with the Juice Bar. This battery, when it’s being used, gets hot. I’m not talking like, put it in your gloves in the winter to keep your hands warm hot, I’m talking painful to keep your skin on it hot. Which means you’ve got to be careful where you put it while using it. You can’t leave it on something vulnerable to heat, and you definitely don’t want to have it in your pocket where you might accidentally put your hand only to get a little bit of a shock. Trust me on that one.

In all, this battery isn’t bad. If you can figure out a way to insulate the battery so you don’t burn yourself and also a way to charge while still being able to effectively use your phone (because of the connection), then this battery is great. Having a solar panel to accentuate your charging capabilities and expand the category of areas where you can use this device is also a bonus. But I feel like there are better choices for you to purchase.

Friday, November 26, 2010

Casemate Extender

The Casemate Extender is right about in the middle of the pack as far as our recommendations go. The version we have was made for the iPhone 3G or iPhone 3GS, so I can’t speak to whether the Extender for the iPhone 4 works better. I’m not saying that it was a waste of money, but it could have performed better.

The Casemate Extender charges via USB cord and USB cord only, which makes me automatically knock it down a few pegs. I prefer to have multiple ways to charge. That being said, it only takes about an hour to and hour and a half to fully charge this battery. Once that’s done, fitting it to your iPhone is fairly simple. It’s a snug fit, though, so make sure you line up all the grooves correctly.

After it’s on, it doesn’t begin immediately charging, which is a positive in my book. In fact, you can have your phone already in it while it charges up without it wasting battery keeping your phone alive. Because it’s a pretty sturdy case, this means that you ca use it as a protective device for your phone when your phone doesn’t need charging.

However, once that battery goes into the red, just press the button on the back of the Extender until it begins to charge the iPhone. From there, it will keep charging (even if you are actively using your phone) for about two hours, at which point it will die. However, it does give you roughly 70% battery power back before it does that, so the tradeoff is pretty good.

As far as usability goes, two hours isn’t great. The Mophie Juice Pack Air will give you more time and is also a case. However, if you’re looking for a fairly inexpensive way to keep your phone protected and charged, you won’t go wrong with the Casemate. It’s also pretty light and slim, which helps keep your phone comfortable.

Thursday, November 25, 2010

Bump

Bump is an application with a simple sounding name and purpose, undermined by a fairly complicated operational system. You’ll need to bump several times before you get the hang of using it.

The first thing you’ll need to do is make a contact in your phonebook that is you. Make it detailed, so that the people you bump with will have all your information. Think of it like a business card, you’ll need you’re name, position, email and website URL. Once you’ve done that, go into Bump, select contacts, and select your contact as you. This way, when you bump with people, they will be able to see that it’s you.

From here, you have to have the person you’re bumping with get their bump application running, then the two of you literally pump funs. A simple touch works, but we felt it necessary to put a little more oomph in our bumping. You can choose your own bumping style.

The first thing you’ll notice after bumping is that there is nothing to take form the other person’s phone. This is because you have to select files to send to their phone. If you exit the linked screen and go back to Bump’s homepage, you’ll see there are several choices of buttons on the bottom. You can select photos, music (only 100 at a time), contacts and social networks. Once you’ve chosen what you want to share, and they have as well, bump again. Now you can select the different options presented, skim through your choices, and download all the things you want to download.

Once you’ve done it enough, Bump runs pretty smoothly. And it’s free, which always helps. But choosing your files to share isn’t exactly intuitive, and there is usually at least a little confusion after bumping as to what is available for the taking, where it is, and whether it has actually been downloaded. Still, Bump is a fast way to share a lot of information, like contacts and pictures, and the fact that it’s free means it is definitely worth putting it onto your phone.

Scanner Pro

Scanner Pro is one of my favorite applications for the iPhone. It’s pretty cheap, and it has one job that it performs admirably, which is to combine files into one PDF document.

The best way I discovered for using this application is to use the camera on your phone. You can either take new pictures while in the application, or you can import them from your camera roll. You can choose to have these load up in Black and White, Grayscale or Color. Holding your camera over the document you want to scan and snapping your picture works wonderfully.

Once you have your picture, you have to select either a portion of it, or the full picture. I typically just hit select all, because I normally want the full image. You also need to make sure you select the correct processing type. The application automatically selects text first processing, but if you’re sending an image, you want photo. You also need to choose your page size. After that, you can bundle it with other images to make a larger PDF document. When you’re finished, you can hit the actions page to enable password protection. I haven’t needed to do that yet, but I could see where password protection could come in handy.

Lastly, you have to get it off your phone. I really like how the application accomplishes this. You can hit the actions button to print or fax the PDF (although you have to have print n share to print things). You can email the PDF by touching the mail button. Or you can upload your file to Evernote (another application we have reviewed), Google Docs, Dropbox (again, this is reviwed elsewhere) or iDisk/WebDAV.

In all, I feel like this application is very simple, and very tight in its design. There aren’t many ways to get lost in it because it’s so straightforward. It works well, it gives you plenty of protection, and it has several ways to get your files off your phone to a variety of sources.

Wednesday, November 24, 2010

Freeloader Solar Charger

The Freeloader Solar Charger is a pretty cool external battery charger. It doesn’t look like much, but it definitely gets you what you’re looking for, which is a ton of battery. It’s not really on the scale of the Casemate or the Mophie Air, but it does power your phone up quite a bit.

A drawback of the Freeloader is that it takes quite a while to charge. It took three or four hours for mine to get to maximum charge, and that was using the USB power cord. Using the solar panels takes even longer. But once it was charged, it boosted my power total from 10% battery to nearly full in about an hour and a half. And it still had some power left in it to give to me.

Using the solar panels, you can’t make more power than you spend as you use it, even on the shiniest day (and it better be bright, or you won’t get anything out of it). Still, it slows down my power loss as I used my iPhone, so it definitely has an impact on your usage. The battery itself, once charged, is good enough for me to recommend, but adding the solar panels to cut back on how quickly you use battery as well as power back up in the field makes me consider the Freeloader a must have for most journalists toolbags. The fact that it has an adaptor that fits nearly any dock, be it a mobile phone, digital camera or other portable handheld device only sweetens the deal.

The only real drawback to the Freeloader is the fact that it can only be charged by solar power or USB connection, no car charger or wall plug. Still, if you’re using the external battery, chances are you have a computer nearby, and it will charge even if your laptop is shut, so keeping it powered up isn’t typically too much of an issue.

If you can, order one of these, or borrow it from a friend and don’t give it back, because it’s a worthwhile investment and you’ll find ways to use it.

Tuesday, November 23, 2010

Griffin Reserve Battery

When I was in high school playing football, and there was an athlete who looked like an all American but couldn’t really play ball, my coaches had a saying. “Looks like Tarzan, plays like Jane”. Griffin reserve battery? You look like Tarzan, but you absolutely play like Jane.

The exterior is sleek. Its high gloss black and all the lines fit together. Even when it’s in the charging dock, it fits so it looks like one solid piece. It connects to either of its chargers via magnets, making it seem that much cooler. Needless to say, I was psyched when I had it all charged up (you can tell by pushing the button on the top, and seeing how many lights light up). I let my battery drain to 10%, plugged in the Griffin, and then let it sit. It charged for nearly exactly 1 hour, while sitting idle, before it ran out of power. When I checked to see how much battery I now had, I was shocked to find that I had slightly less than 25%.

The Griffin Reserve Battery is just what the name says, a reserve. As I discovered, it will not be filling up your battery any time soon. It’s enough to keep you going for about half and hour more than you would have, and that’s it.

That’s not to say it’s without its positives. It charges through a all outlet or in your car through the AC converter in your cigarette lighter. Ostensibly, you could head out on assignment using the reserve to keep your battery full, put the battery in the charger and go report, and then use the Reserve to keep you going on your way back. But honestly, for the money, I think there are better options out there.

WordPress

WordPress is a free application that allows you to control your WordPress account through your mobile device. If you like WordPress already you’re going to like this application. Personally, I find it kind of obnoxious to navigate. The site on a desk or laptop is irritating enough for the casual blogger, so the application isn’t much better. It is pretty handy in that you can take pictures and video through the application as well as import them from the camera roll. You can type up a post and publish it all from the palm of your hand. You can even organize and approve comments you receive. You can even add pages. That’s great if you want to do that from your phone, but it makes things a little difficult. It’s not a straightforward application. If you already use WordPress this is a handy tool, but if you have the choice to go through another blog host, I’d go with that if you want to blog from your mobile device. If you’ve done some blogging in the past and are used to different hosts you may be all right, if you are a first timer this will be difficult to learn through. Because it’s free though, if you’re interested, try it out, it couldn’t hurt.

Monday, November 22, 2010

Sima Light Panel SL-20LX

The Sima Light Panel is one of my personal favorites as far as lights go. I like its size to light output, and I like it’s flexibility as far as mounting goes. Its power source is a positive and a negative, but in all, it’s a pretty utilitarian device.

The Sima is small. At basically 2 x 2 x 1” this thing is sleek. That measurement isn’t exactly accurate after adding the arm, but if you don’t have a cold foot or a hot shoe, then holding this light isn’t an issue.

This light is bright. There’s no dimmer on it, no way to regulate the brightness, but if you’re in a fairly dark situation, it’s going to shine.

The best part about the Sima is how it mounts. First, there is an arm which attaches via hot shoe to the light panel. This arm can be manually extended and retracted, to vary the distance from your camera. The other end of the arm can be attached by either hot shoe or cold foot to a mount. Alternately, should you not want to fool around with the arm, you can attach the light panel directly to a mount using the hot shoe you would have used with the arm. Again, if you don’t have a mount, it’s small enough that you can carry it and use it with your hand alone.

Lastly, the power source. Unlike our other lights, the Sima is charged by cable from any wall outlet. It takes a little while to charge (I let it go for about two hours), but it holds power for quite a while. And when you’re done, you can leave it somewhere to charge while you edit photos. The pro to this is the money you save on batteries, which get pretty expensive after a while. This is perhaps balanced out by the fact that, if you’re in the field for a day (or night) and you don’t have access to a wall outlet (or AC converter from your car), then you’re out of luck once it runs out of juice. Making the Sima battery or plug-in friendly would have been a huge boost in its favor, but alas it just isn’t.

Even with the minor issues of needing a mount of some kind (unless you’re going handheld, which really isn’t an issue usually) and the battery vs. outlet debate, this is still a good light. I’d recommend it for any mobile journalist’s tool bag.

Sunday, November 21, 2010

Solio Classic Hybrid Charger

"The device that started a movement..."

As far as hybrid chargers goes, this is probably my favorite - for several reasons. First of all, it comes with a bunch of adapter plugs and pins so that you can charge virtually any mobile device. According to their website, it is compatible with over 3,200+ devices. They are constantly cranking out new pieces, so if you cannot find the one you need, simply email them. Not only do you get a handful of adapting plus for the mobile device end of the cord, but you also get several pieces to suit almost any wall unit. You can charge the device through a wall socket or through a computer via a USB port. While researching this device, I came across a bold statement - that this charger will hold its charge for up to one year. This could be extremely handy for unexpected situations. Just charge it up and leave it in your backpack or car for emergencies, or use it year-round.

Another reason I love this hybrid is that there are three large panels for a lot of light energy intake. This is a very nice feature because charging this device only with solar energy can take a long time and most devices have smaller panels or maybe only one panel. According to the introductory booklet that comes with the device, it can take up to 48 hours to charge the device if it is cloudy or you are not in direct sunlight. This eco-friendly option may be time consuming, but if you can afford to wait, or you are on vacation (or simply just can't find a plug), this is a perfect solution. When you are done with it, just slide the three arms up. It is compact, which is perfect for a backpack journalist carrying many devices with them. For more information, visit http://www.solio.com/charger/solio-charger-classic.html.

Saturday, November 20, 2010

Catch Notes

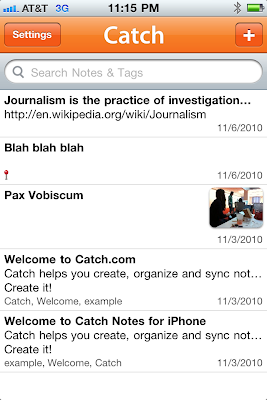
Catch Notes is a simple application that allows you to type out notes, add pictures and hashtags to keep yourself organized. The hashtags allow you to search for specific notes on a certain topic. Just like Twitter, similar ideas are bundled together. Pictures allow you to remember snap a shot of something you want to remember. An interviewee perhaps, or a detail of your surroundings. It’s a simple format and helps when you’re out in the field interviewing and trying to remember what actually happened at an event so you can review your notes later.

There are other cool features that really come in handy. If you set up an account online at Catch.com it allows you to pull up those notes from the web on your mobile device. This way a links, facts or question you wrote can be easily accessed in the field. You can also backup your notes and save them on this account directly from your phone. This is a reassuring ability, because you never know when you might lose everything when you’re working with technology.

It's a good application, but there are other great note taking applications that pass this one up. It's free, so if you're looking for something that is simple for note taking and storing pictures to jog your memory, this works fine. It doesn't have audio or drawing capabilities like some other good note taking apps. It really depends on what you're looking for and what you'd use. The Internet account portion is definitely worth having.

Friday, November 19, 2010

VeriCorder MiniMic

I was not a fan of this microphone. It’s a couple inches long so really it doesn’t help pick up sound. It doesn’t capture any more audio than your camera’s built-in microphone does. If you tap it at all you get a terrible noise that is incredibly distracting and definitely not something you want in your videos or sound bites. If you have an OWLE Bubo, this microphone attaches to it. That would come in handy if you had one, but still, the microphone doesn't help enough to make it worth it. There are so many other types of mics you could and should be using over this one.

You just put the microphone in the headphones jack and go. If you want to use a microphone at all get a chord to attach a stick mic. This tiny piece of equipment doesn’t help any more than your actual phone, so I’m not sure why you’d want to spend your money on it. You’re also risking the quality of your audio or video if you happen to bump it. Not a fan, spend your money elsewhere.

Thursday, November 18, 2010

Fring

Fring is a big money saver. You can chat, and call from your phone all through this one application. This way you don’t have to worry about your phone contract. You can IM on GoogleTalk, AIM, Yahoo, and view Twitter messages among other services. You can call from this application. Essentially this is just a way to keep all of your social media and communication connected and in one place.

Personally I find this really distracting. If you hook up your Facebook and Twitter your stream of statuses and Tweets gets hard to keep track of. Also, they recently took away the video chat capability when Skype split from them. It’s not worth the capabilities you get. Actually, if you don’t continually check on your stream with Fring you end up having a ton of messages built up depending on how many of your friends Tweet and Facebook. Honestly, I don’t really know why you’d want this unless you’re planning on only using a few applications. The Facebook and Twitter applications themselves are easier to use than this, so there’s not really a good reason why you’d want to use this.

Wednesday, November 17, 2010

Jelly Filter Lens

We had two jelly filters to test, one was the starburst filter, and the other was the wide-angle lens. They come in other filters, vignette, antique, you can take your pick. They are small and portable and easy to attach to your device. They have a jelly, sticky ring around the lens that allows you to attach the lens right around the camera. It sticks just as well as the magnetic lenses do. Apparently you can clean the dirt off the sticky part with water, but eventually it’s going to stop sticking.

Honestly, I don’t know why you’d need these filters. A lot of the photo editing applications already have these. If you use the applications you can have the original picture as well without the affect already on there permanently. I think the wide-angle lens might be the only one that is worth anything. You can get more in the shot by using it. If you’re too close to an object or scene to get everything or everyone in it, it definitely comes in handy. The problem is the lenses bend the photo a little on the edges. Also, you can’t use a flash with these lenses. If you do the lens is caught in the flash and you can’t see anything except the lens. Really, I think these are a waste of money since you can doctor your photos with other applications.

SmartLens 2 in 1 lens

The SmartLens 2 in 1 lens is a fun little gimmick of a device. It probably works better with a 4G or droid, where the curve of the phone doesn’t interfere with the camera. On a 3G, though, it actually worked surprisingly well for me.

The only real negative to using this lens is that you’re going to have to apply a magnetic ring to the back of your phone using the adhesive already on the ring. I haven’t attempted to take it off, yet, because I don’t know that the glue is sticky enough to put it back on, and the lens only comes with one ring. Moral of the story is, attach it to something you want to use long-term.

After that, you don’t have to worry about the lens NOT working, which is maybe not a great way to look at it. I didn’t notice a huge improvement in quality by using it, but at the same time, it didn’t hurt. It doesn’t bend the picture like the wider angle on the Bubo does, and the macro lens is decent. Sometimes it won’t work, and it’ll just be fuzzy, but if you can get close enough (often nearly touching) then you might be able to get some cool details.

The best part is, this thing is incredibly easy to put on and take off. So, attach the magnetic ring, put the lens in your pocket, and head out.

Tuesday, November 16, 2010

Qik Video Camera Pro

Qik is one of the most popular, and easy to use applications for mobile devices. The app has numerous uses from a journalistic standpoint as well as in your everyday life. For example, if you are hanging out at a local venue and you run across an interesting performer of some sort you can take a video and upload it to Qik right then and there. It’s the same for performers that have family and friends that can’t see their show. Just tell people when and where to go to see it broadcast. In terms of journalistic value, this application can be used for breaking news. Not by newsrooms, but a free lance journalist could be the first to get footage of a breaking news story in the field. That footage could then be picked up by stations in order to tell the public what’s going on.

It is incredibly useful for vloggers. While you are filming video for a blog a person watching can send you comments that appear in your screen, which you can then respond to right then in the video. It’s just an interesting concept and allows for a more open discussion with your followers. It opens up so many more doors than simply having a comments box under a blog post or video.

Qik even has the ability to save your videos if, for some reason, you lose your signal. As soon as you regain Internet access the videos are uploaded without anything getting lost. The application offers many effects like frosted glass and black and white. It’s one of the fastest ways to upload to Facebook and YouTube, as well as many popular blog hosts and Twitter. The render time isn’t long so you have a little less frustration.

Right now there’s no way to edit your videos, so what you record is what you get. That means be careful. Don’t say anything you would need to edit out then.

Monday, November 15, 2010

Tumblr

In terms of blogging Tumblr is the easiest way to get accustomed to the blog-o-sphere. You simply set up your blog about whatever topic you choose, pick your layout and you’re set. The application from your mobile phone is as easy to use as the online version. You can see the blogs you follow and their posts on your dashboard and you can upload text, photos, quotes, links, chats, audio and video all from your mobile device. You can take the video through the application or get it from the camera roll, same with photos. But, you can only record audio through the application.

It’s super simple and doesn’t take long at all. I highly recommend this application and blog host if you’re just starting to get into blogs or looking for a user friendly site. Also, with many other hosts you do not have the option of uploading video without upgrading. This host allows you to post whatever you want. This application would allow someone to easily manage a page for a performer. Someone could cover events as they unfold in a certain area. Really there are unlimited uses for this blog site. A lot of blogs are just random things people find interesting, sometimes they're themed. The sky's the limit here.

Bescor LED-50DA Dimmable Light Panel


The Bescor LED-50DA Dimmable Light Panel is a pretty bulky yet powerful external flash. When using it, it was effective, which can’t really be argued with, but perhaps not in the prescribed way.

The first thing one notices when taking the Bescor out of the box is how large it is. It’s just not a sleek or sexy piece of hardware. It’s not an easy shape to pack into a bag with other things, and it’ll take up room, so if you’re going to use it, you may as well commit all the way and not bring any other lights with you. Unless you plan to bring a very large bag.

Mounting the Bescor is also an issue. It’s got a hot shoe on the bottom which can be hooked into any hot shoe mount, but this requires you to have one of those to use with your phone. Right away you’ll see that this requires you to have something capable of playing host to your phone AND holding your light. I vote you use the Owle Bubo, but there are of course other options. Or you could just hold the light, which is what I did. You might be thinking that this choice would be incredibly inconvenient. And to an extent, you’d be right. It means both of my hands were full, and if I had smaller hands I might not have been able to hold my phone, press the capture button, and hold and angle the light correctly. However, give it a few minutes and you’ll get used to it.

A nice feature the Bescor boasts is the ability to dim its light. This thing gets pretty bright, so you’ll dim fairly often. You can do this by spinning a wheel on the side of the light (which is reachable via fingertip using only one hand, should you not have a hot shoe).

The Bescor also comes with a sepia shaded panel you can replace the normal translucent one with. It doesn’t tint your light, but it does make it softer, so for interviews this is something you can play around with and decide whether you like. The important thing is that it’s there.

As far as battery life goes, you can leave the Bescor going for hours. I used it in a corn maze, and had it on and off for nearly three and a half hours, without worrying about losing my batteries. I’m not saying you shouldn’t keep some spares on you, I’m just saying it’s less likely than some other choices.

In all, I’d recommend this light, but I would say you need to either already have the gear to use it properly (a mount of some kind) or have large enough hands and be comfortable enough with your mobile reporting that you can go out into the field and use it roughshod.

Joby GorillaTorch Flare


The GorillaTorch Flare is downright cool. There’s so many interesting features involved that I feel like any photographer can eventually, given time and patience, find a use for this device. It may not be the best light as far as compensating for a mobile phone’s lack of a workable camera flash, but it acts as a bit of a Swiss Army Knife in terms of usability.

Like the Gorilla Mobile, the legs are flexible, but rigid enough to hold itself up. There’s no hot shoe or cold foot, but if you can find a rail or a post or any remotely flat surface/ something to wrap its legs around, then it’s going to be fine. It’s the same principle as putting an external flash on a tripod for a photo shoot. The only real drawback is you have to anticipate where you’re going to want your light coming from, you can’t really point and shoot. Another amazing feature, one I was excited about discovering, is that Joby decided to put some decently strong magnets on the bottoms of the feet. They won’t hold it to everything, but they do enough to make the Torch that much more versatile.

As far as the actual light goes, it’s a bit on the fluorescent side as far as color. It’s also pretty narrow, so don’t expect to light a big scene. But you can change the light from dim to medium to bright, and then take it a step further and make it a strobe. Keep clicking, and it will turn to a red light, and one last click makes it a red strobe. Not positive you’ll ever want to use the red light for a strobe, but if you try really hard I’m sure there’s a purpose for it out there somewhere. Worst-case scenario, you’re car breaks down and you strobe a red light to protect yourself from oncoming traffic as you try and fix it.

I have to recommend this device purely on the upside it has. It’s light, it’s small, you can bring with you pretty easily, and with minor effort you can find a use for it.

Sunday, November 14, 2010

PixelPipe

Pixelpipe is one of the applications that really does everything. They try to combine all of your favorite social media sites into on application. This way, you only need one app to control your social life. You can store email addresses and social networks within the application. This allows you to send photos, or videos to anyone you want to. You can update your blog, Tweet from multiple accounts, and check other social media sites. All you do is check the sites you want your content to be uploaded on in the settings menu. I can send multiple pictures from my camera roll to my Pixelpipe account. It sounds great, but there are definitely some bugs. They’re actually kind of large kinks that really dissuade a user from picking this platform.

Here’s the problem, it doesn’t work as well as it’s marketed. It is incredibly slow when you have big files, or too many pictures. Photos go up relatively easily, sometimes videos have issues uploading. It gets pretty frustrating. Also, it has recently been taken out of the iTunes store. This isn’t the first time this has happened. If you’re going to go for a file transmission app, you should probably find one that is more stable than Pixelpipe. I can still see the videos I’ve already uploaded to the website, and their blog is still around and says they’ve completed Symbian signing. Before that their post was about Pixelpipe for Android. I don’t think this application is worth the hassle, considering now you can’t even find it on the iTunes store. There are other apps out there that have similar functions that work better overall.

For more file transfer applications, check out Jennifer's DropBox post.

Saturday, November 13, 2010

Foursquare

Foursquare is a fun little application that seems to be getting the brunt of some pop culture venom these days. Many of my colleagues say that it’s everything from over-reaching to lame. It seems especially to be catching flak from the college-aged population. However, if you’re willing to stick with it and ignore the mild social stigma, there’s some interesting features to mined from the app.

Using it isn’t all that difficult, although you’re going to need a solid internet connection. Less than four bars of Wi-Fi is probably a no-go, and the 3G can be iffy sometimes. Once you have the connection, though, it’s a piece of cake. The Check In button gives you a list of places, You can choose from the list, use the search bar to look for a nearby location, or create a new location by hitting the “+” button at the top of the screen. Once you’ve chosen or created a new location, just write what you’re doing (think facebook or Twitter status) and hit check in.

Now comes the addicting part of Foursquare. You get points for how many stops and new locations you go to each day. From there, medals and awards can be gained depending on how many new locations you visit, how many stops you make, or how often you revisit certain locations. If you’re really lucky, you may even become mayor of a location (meaning you’ve checked in there the most times in the last two months). Becoming mayor can be difficult if you’re just joining the service and don’t frequent a lot of places often, as someone else has probably been checking in quite regularly. However, if you can find a spot that hasn’t been checked in at before, then only a few visits makes you a mayor. Alternatively, creating a new place, like for instance your home, and checking in can be a quick route to becoming mayor.

To make matters more interesting, some businesses are beginning to jump on the Foursquare bandwagon. Certain locations will offer deals if you check in at their location (or if you’re mayor). Businesses are also offering unique medals to users who go to certain areas and check-in as a way of showing off your ability to get around. However, users should be careful. Only recently, I followed the scent of a “special” to a store, only to discover that it was some kind of practical joke and not at all a real business offer.

In all, the application is fun, but it’s not terribly interactive. You get on when you arrive somewhere, check-in, then shut it off. You can see who else is at your location, but you can’t see their status unless they are your friends, and not enough people that I’m friends with use the program that I can comb through their statuses for more than a few minutes, meaning it’s a check in, log out sort of process for me. But for some people out there, it’s going to be a fun new way to play around with their friends, gain some points, and hopefully some bragging rights by becoming a mayor.

Friday, November 12, 2010

UStream Recorder and Broadcaster

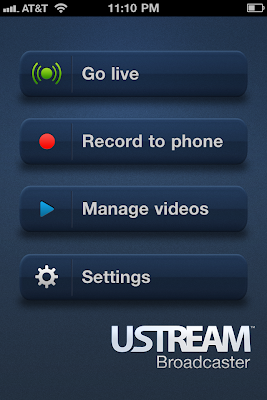
There are two different UStream applications. One is UStream Recorder and the other is UStream Broadcaster. The differences between the two are pretty self-explanatory. Both have their own uses that would benefit you in different situations.

The UStream Recorder is a good tool - it’s easy to upload videos that are in your camera roll. You can also record a video in the application but you have to be careful. If you don’t hold it the correct way the video may end up side ways or upside down when you upload it. This can happen with the camera roll videos as well. Overall, it doesn’t take long to upload to UStream and it has similar qualities to Qik. I happen to like Qik a little more. UStream is a bit laggy sometimes and the videos come out dark if you don’t have excellent lighting.

Now, UStream Broadcaster allows you to see people tweeting at you while you’re actually broadcasting live. Some people find that distracting, but it’s an interesting concept. Say you’re filming a vlog or a show; you can answer those tweets as they come up on your screen. It would be incredibly useful to cover a concert or performance. If you alert people before the actual event they can tune in and watch as you stream it. This can be a little laggy as well. As technology improves I’m sure this will stop being such a problem.

You can’t edit these videos either. So again, be careful with what you say when you’re streaming live, or if you want to upload the videos. Technically you could just edit the video in a different application, save it to your camera roll and upload it from there. That’s always an option.

To see UStream in action, check out Jennifer's election day coverage post.

Cover It Live

This would be a great idea if all the features worked how they are supposed to.

You are able to broadcast your written messages and photos easily. Essentially what you’re doing is live blogging an event of some sort. It is very simple and has great potential. You can use video captured on your phone or you can capture video through the application. It works the same with photos. Audio is captured through the app.

Right now it needs an upgrade though. It keeps saying something is wrong when I tried to upload audio or video. It didn’t matter if I used the video already stored in the camera roll, it still didn’t work. I tried making the video shorter, that didn't help at all. Same with audio. I can try to capture audio through the application and it still says I'm doing something wrong. The audio can only be 30 seconds long anyway, so shortening that didn't do anything. It is glitchy and gets frustrating if you’re trying to cover an important event. I think that if they fix the kinks, it will be a really good tool to use. They just need to tweek a few aspects. Multiple aspects actually.

For more on CoverItLive, check out Jennifer's election coverage post.

Thursday, November 11, 2010

Android Keyboards

To round out our keyboards section, we decided to take a look at alternative keyboards on Android mobile devices.

8pen:
The first keyboard, 8pen, is an alternative to the QWERTY keyboard. The letters are placed on four axes and are arranged in a way so the most common letters used are closer to the middle. This keyboard is supposed to more of a natural motion than the common "pecking" of texting and typing on a mobile device. To type on the 8pen, start your finger on the black dot. If you want to type 'a,' slide your finger from the dot on the side of the red bar where the 'a' is located. Continue moving over the red line and back to the black dot. If you pick up your finger, this will create a space. The circular motions are supposed to mimic writing.

Not surprisingly, this keyboard is very hard to get used to. The letters are not imprinted in my brain like they are with a QWERTY keyboard. I had to keep looking down to find the letters, but sometimes my finger was covering the letters so I had to pick my finger up, creating a space, and take a peek. It took a fair amount of time to get accustomed to this keyboard, but once I got the hang out it I started to like it. It was almost like a game - I wanted to get the process right - without any mistakes. Supposedly, with this keyboard, you will not have to look what you are typing once you memorize the letters, which could be very handy and fast for anyone in need of quick messages. I recommend this application if you have patience and don't mind taking a long time to send messages for a while. For more information, visit the 8pen website or watch the informational video here.

SlideIT:
The second keyboard, SlideIT, is an easier way to type on the traditional QWERTY keyboard. Not trying to be cheesy, but instead of picking up your finger, simply slide it - like the name says. It makes typing so much faster than the pecking method of traditional keyboards on mobile devices. Now, people don't have to worry about their finger being too large. You can turn this writing style on and off, so it is really easy to try. It doesn't take very long to get accustomed to this style because you already know the layout and placement of the keys. The only downside of this keyboard is that it tries to guess what word you mean since your fingers don't always hit the proper keys. If you are trying to type in a word that it doesn't recognize it may come up with a "?" or guess something incorrectly. This isn't really a problem, though, because you can add words to the app's vocabulary. This application also comes complete with Graffiti mode, which allows you to draw numbers and letters, which are then read by the mobile device. All in all, I would highly recommend this version of QWERTY typing. It it fast, easy to learn and very convenient. For more information, visit SlideIT's website.

Freedom Pro Keyboard

This wireless keyboard is easy to set up and doesn’t require a lot of stress to get it working. Just follow the instructions and you'll have it up and running. The Freedom Pro works with the Android and iPhone. We tested it at a decent distance and it worked even when we were in different rooms. It’s so much easier to type notes and get things organized with a keyboard. The small screens are frustrating to type on especially if you have clumsy, fat fingers. There’s nothing better than being able to type without correcting your spelling errors every two seconds.

The best feature about the Freedom Pro has to be its ability to fold up. That’s my favorite aspect of it. It fits wherever you need it and comes with a case so you never have to worry about destroying it. The keyboard is a little cramped because of the folding, so it does take a little getting used to. It’s not a big problem, but it is annoying at first. I'd take getting used to this keyboard over the tiny iPhone or Android ones any day though. I think a wireless keyboard is definitely a good and necessary investment. It’s too difficult to keep up with notes and internet searches without being able to type.

Wednesday, November 10, 2010

The Bottle Cap Tripod

Along with the Monster Pod, this is another very strange invention for mobile journalists. You take a bottle of water or pop, and place this tripod over the cap. There’s a cold foot on top, so be sure you have a way to screw your device into it. It’s a cheap way to keep your video steady. It actually works like the Zgrip in a way, and is sort of a cheap alternative to the expensive Zgrip. The Bottle Cap Tripod is a little unstable, but it’s better than nothing. It’s kind of cheap, so you might want to invest in something sturdier if you're serious about using a tripod. Using this tripod is better than nothing, but it's not great. Also, I don’t know how many people would take you seriously with your camera mounted to the top of a Coke bottle. Without the bottle, it’s the smallest tripod you'd carry around. That’s a perk, overall it’s kind of just a silly novelty tool. It's not expensive, so you can have it in your arsenal just in case you want a slight improvement over holding the phone.

The Monster Pod

The Monster Pod is the strangest piece of equipment I’ve ever used or seen. It’s a tripod that sticks pretty much wherever you need it to. It stays on branches, rocks, brick, glass, you name it, and it sticks there. Just be careful. If you leave it for longer than 10 minutes it starts to either slide down the wall, or fall off the surface where you stuck it. The circular tripod has an orange Silly Putty like material on the bottom. Simply screw your camera onto the tripod mount and you’re set. You can use your mobile device as your camera; you just need to attach something to your phone that allows you to screw it into the Monster Pod.

It works in any situation. The problem is, it’s very flat, so you might have to be creative with where you stick it to get the shot you want. It’s small enough to fit in your backpack or pocket. It’s also a really light tool. If dirt gets stuck to it, all you need to do is wash it off with water. Also, remember to put the cap back on it when you’re done so you don’t get orange goop on any of your belongings. It’s not a bad piece of equipment, just different. Make sure you have a way to screw your mobile device into it, and make sure you can figure out a place to stick it or you might be in trouble. There are other tripods out there that offer you a more traditional approach to tripods, but it definitely has its place.

Tuesday, November 9, 2010

Mophie Juice Pack Air and Boost

I think this is the best battery to use when you’re on the go. All of the external charges need to be plugged in so they can charge, so that’s something you need to do before taking it to report. But this particular tool saved me when we went to cover an event once. Let’s say you completely forgot to charge your phone and now you need to go out and report. Or you have been using your phone all day and then a breaking news story erupts but your phone might die at any moment. This tool comes to the rescue.

The Juice Pack Air is light and fits right onto the phone. It’s not distracting or annoying to try and store. It basically just feels like you have a case on your phone, but it's really a battery. Certain external batteries get in the way when you’re trying to use the phone to capture audio and video, but this one does a good job of being mobile. It’s secure and you don’t need to baby it or hold the phone a certain way. Just leave it on your iPhone until it’s charged, or keep it on until you’re done with your assignment. It can really be a lifesaver.

The Boost is something you'd use if you didn't bring your charger. It's not really a mobile battery, it's something you'd plug into your phone and leave in until it's ready to go. It's just another option. It's useful if you don't need to actually do any work right away. They both charge the iPhone within a couple of hours. If you leave the Air on, it doesn't really matter how long it takes to charge because you can use the phone while it's doing its job.

Zgrip

I love this tool from Zacuto because it’s hand held. I tend to have an issue with setting up tripods; they’re ungainly and take time to stabilize and balance. This handy piece of equipment allows you to simply hook your iPhone into the device and hold your camera without worrying about your shaky hands. There’s a mount at the top for a mic adapter or external light and another on the bottom of the grip that can be screwed into a bigger tripod if you need to get stationary shots.

I feel like this is a fabulous way to easily gain some stability without sticking a tripod in one place or sticking something like the MonsterPod onto something. This way you can achieve pans and control zoom because the device is always by your hand. This would really be perfect for documentary filmmaking, in journalism we don't tend to pan very much. It is a little more expensive than the other tripods out there, but if you’re looking for something that will come in handy in most situations, this is it. It's durable and well made, so it is built to last. The Zgrip is especially good for events where there is a lot of movement and you might need to move quickly, like sporting events or breaking news.

Purchasing the Zgrip depends on how serious you are about using your mobile phone in the field, and how serious you are about your content. Because of its price it is a tool you really have to want.

Monday, November 8, 2010

Camera Plus

I love this application. It’s not a fancy app, but it really does good work. All you do is take a picture and the application allows you to make it black and white or crop it. The cropping is probably the best part about this tool. You can choose from a circle or rectangular crop. Then once you get the size you want you can turn the crop any direction you need. There’s a zoom capability, but as always, it makes the picture fuzzy, so be careful what you use it for.

You can send the finished picture to your camera roll, or you can send it straight to Facebook, Flickr or Twitter. You can also attach it to an email. It doesn’t take long. The application would allow you to cover stories then immediately display your photos on whichever medium you choose. Again, breaking news stories or events would be good places for this. You could live Tweet from an event and add in some pictures of the goings on. There are other applications that act similarly, but it does the job and is trustworthy. Plus, it’s free, so it couldn’t hurt.

There is an upgrade you can purchase called Camera Plus Pro that allows you a lot more flexibility and options on doctoring photos. Recently, the manufacturer took away the video zoom capability, which has upset many users. If you need video zoom, don’t buy this app. Overall though, it looks just as simple as the free version, just with a ton of more options.

Hipstamatic

Hipstamatic is my personal least favorite application, which is odd because as far as features for photography (NOT editing) go, versatile barely describes it. Part of the reason I’m so negative is because it takes a lot of getting used to, you really can’t jump into it and go. Also, it comes with a pretty bare shelf of features for the money you invested in the application’s purchase. How do I get more features, you ask? A dollar at a time, I say.

Open the app and it may take you a moment to orient yourself. You can click the flash to activate the camera’s “flash”, and it will make the charging noise and take a moment to get set (you can shoot while it charges, the charge is just for aesthetic appearance). The slat on the left will tell you what film you’re using, and you can view your pictures buy tapping on the bottom left.

To get into the meat of this thing, hit the arrow in the bottom right corner. If you’re a photographer, it’ll take you a moment to realize you’re in familiar territory. If you’re not, make sure you play with this application for several minutes to figure it out. You can select different films, and by tapping the film you can see the effect it will have. Same for flashes, and then for lenses. Want more choices? Go buy them, cause they don’t come free. On this screen, you can also change the quality of your pictures by adjusting the lever in the center of the main screen. Once you’ve mixed and matched to take the desired style of picture (good luck if you don’t have any training, here), go back to the camera taking screen and get after it.

Hipstamatic looks the best. It does. It’s got this old timey, film and dark room feel to it, and in theory having the ability to choose all the aspects of your picture taking process would be awesome. And if you know what you’re doing and have experience with these tools, then I would imagine it’s intriguing. But it’s just too complicated for a lot of journalists to take this into the field without any experience using it. You’re not going to get an image you can use for news, most likely, because all the “equipment” it comes with will cause all different tints. And even though it’s only a dollar each, to spend the money to figure out what does and does not work costs too much cash and time.

There are two details about this program I DID really like. Your photos can be grouped into “stacks” for easy organization. Not a big deal, but it’s often overlooked in photo programs, and it’s something that makes life easier. Second, Hipstamatic hosts contests, and you can submit your photos to these contests. Not something you would normally do while out in the field, but I’m sure photographers would enjoy the ability to submit their work. I can see this particular feature carrying this application, especially if photographers and Synthetic Corp. (makers of Hipstamatic) take it seriously.

Simply put, Hipstamatic is a cool idea, and has a lot to offer to the feature writers and artists of this world who know how to work a camera. If you don’t fit that criteria, steer clear.

Sunday, November 7, 2010

Dragon Dictation

Dragon Dictation is an extremely simple, fairly interesting little transcription application for the iPhone. Right here in the beginning, I should say that the best thing about it is that it’s free. If it weren’t free, I highly doubt it would be worth the cost to buy it, especially because it literally nothing more than a dictation device. That being said, there’s some cool things about this application.

The first thing that you’ll notice when you boot it up is that it updates itself with your contact names. This isn’t to say that it will necessarily be able to recognize them when it hears them, but it certainly adds to the probability that it will.

From there, the process is pretty straightforward. Tap the screen and start talking. I would suggest that you talk slowly and enunciate for the best accuracy. When you’re finished, tap again. It will now show you its best guess at what you just said. You have the option here of opening up your keyboard and altering the text (sort of defeats the purpose of the application when it makes a lot of mistakes), tapping the red circle and re-recording, or sending the text.

The sharing part is the most intriguing. It will allow you to text whatever you want to upload, email it, post it to facebook and/or twitter, or copy it all as a block of text for you to then paste somewhere else.

In all, it’s really not great at what it does. There’s probably a better version of this type of application somewhere. But balance the faults against the fact that it’s free, and I feel that you will find it’s worth the download to have this in your toolbag. It can definitely be handy if you’re driving back from somewhere to record a script on the way. Also, it’s important to mention that attaching an external mic, such as the Blue Mikey (it’s small and decent), it vastly improves the accuracy of Dragon Dictation. I can’t recommend it as the best thing out there for dictation, but it’s pretty good for being free.

Photoshop Express

Photoshop Express is a very simple photo editing application for the iPhone. The best thing about this application is that it is free, unlike many of the other photo applications we tested.

There are five buttons along the button of the application: Adobe, Edit, Online, Upload and Settings. Adobe is simply sample photos and links to more effects, tips, etc... The edit tab is what you will probably use most. On the edit tab (see photo right), you can crop, adjust the exposure, saturation, tint, contrast or make the photo black & white. The next button over is used to give the photo effects such as sketch, soft focus or sharpen. The final button on the top row (the stars) allows you to add more effects, such as vibrant, pop, vignette blur, etc... and borders.

Those are your only options, but that should be enough for journalistic uses. The bottom buttons let you cancel, redo/undo and save. Under the save menu, as you can see in the image, you can save and exit, upload (Photoshop.com), post to Facebook or TwitPic.

This application is geared for quick edits to photos. To edit a photo, click a type of edit that you want to make, such as Saturation. It will give you a tip (unless you turn them off) on how to best use this edit. For instance, the tip on how to change the saturation says "slowly slide your finger left/right over the image to adjust the saturation level." All you have to do is pinch or push like you would to zoom in/out and the levels will change.

I would definitely recommend this application. It is easy, powerful and free.

Photogene

Photogene is easily my favorite photo editing application on the iPhone. It is very simple, yet effective. It does everything that you would want to do to edit your photos in a journalistic function and then some.

The buttons on the side are fairly self-explanatory, but I will briefly go over them. The scissors button is for cropping - simply drag the size of the box you would like and hit crop. The two arrows in the form of a box is for rotating the image. The filter button is the one that looks like an oil filter. This is for more drastic effects such as sharpen, pencil, blur, black & white, posterize, sepia, nightvision and heatmap. You can adjust the strength of each of these filters or reset to the original photo. The color wheel button allows you a great deal of control when it comes to color adjusting. You can change the levels (auto levels works wonderfully), the exposure, the colors and the red-green-blue balance of the photo.

The next two buttons are something that you will most likely not use for journalistic function - the star button allows you to add shapes such as a speech bubble and the square allows you to add a border or frame.

If you make a mistake, click on the back or redo arrows, which are the next buttons down. The final button is used to save your edits. You can change the resolution of the photo (200, 320, 640, 800, 1024, 1600, 2048 and 2592 for high resolution images). You can also preserve geotags, and share your image in a variety of ways such as email, FTP, flickr and Facebook.

Photogene is only $1.99 and I would highly recommend it!

If you don't take my word, take the word of Glyn Evans, the founder of iPhonegraphy. His website, http://www.iphoneography.com/ features all photos shot on mobile devices. This is his opinion of Photogene:
Photogene is like having a desktop photo editor in your pocket, giving you the ability to truly edit your photos on the go, letting you crop, sharpen, straighten, rotate and add frames to your photos, as well as manually or automatically adjust histogram levels, gamma correction, RGB balance, the colour temperature and saturation.

Saturday, November 6, 2010

Eye-Fi

The Eye-Fi is a device that automatically backs up your camera for you. It is a SD card that comes together with Wi-Fi. We have a 4GB+Wi-Fi card, which is $69.99 For a complete list of products, visit their website here.

To use the Eye-Fi, simply leave on your camera when you get home, or to any Wi-Fi spot that you have preset as an accepted spot on your card. It will do the uploading for you. If you choose, it will also upload your photos to Facebook, flickr, YouTube or a variety of other hosts.

It is really easy to set up - just plug the Wi-Fi card into the USB port that comes with the device and it will do the rest. It has prompts and guides to help you set up your wireless networks and other sites you may wish to publish your photos.

Some of the features of the Geo card we have are:
  • Geotags your photos
  • The photos come in via date-based folders for easy-to-find files
  • Compatible with a wide variety of cameras
  • You can select certain photos to upload instead of waiting for the whole set to upload
  • You can also set up Twitter, Facebook or email alerts to notify you when your photos are uploading online
I wouldn't recommend this tool for the serious photojournalist. It is not as quick as you might think. It takes a while because the device works through Wi-Fi. It definitely doesn't save any time, and I don't really see the purpose for a journalist. It is not that much of an inconvenience to use a card reader or connect your camera to your computer via a USB port. I could see how it would be handy for a parent or someone on the go who doesn't have time to sit there and babysit your uploading photos.

Here is a video of my computer screen as I choose photos to export to Facebook. Watch the process below:

Friday, November 5, 2010

Dropbox

Dropbox is one of my favorite finds since starting this endeavor. Dropbox allows you to sync multiple computers (including phones, both iPhone and Android), share and store files. To use on your computer, simply sign up for Dropbox and download the application to your computer. When you are finished, you should see an additional icon near your Bluetooth, AirPort and battery life meter (if you are on a Mac). It will also add an icon to your folders. So, now when you are in a folder on your Desktop, you can choose to share/store/sync the file with Dropbox.

The next step is installing the application on your phone. For the iPhone, Dropbox is great for sharing/storing/syncing photos. You can create a folder by pushing the plus sign in the lower left corner. To add a photo, click the camera on the bottom row. The application comes with an iPhone intro and a Getting Started guide. It really couldn't be any easier.

If you want to share files, go to their website and click on the Sharing tab of your account. It will ask you to pick a folder to share with others. When a file is shared, it will sync automatically to their computer.

The only thing I should note about this application is the amount of free space you get. With a free account, you get 2GB of free space, which is not a lot if you plan on storing a lot of photo files. 2GB is pretty standard for online file sharing, and can be found on other sites such as Mozy. You can upgrade the 50 GB for $99/year or 100GB for $199/year. For Mozy, it is unlimited storage for around $55 dollars a year, but Mozy doesn't have a mobile application as far as I know.

I really like this application and I would highly recommend it for all newsrooms. The application is free and you get 2 GB free. You can use it to get information to your editors quickly as long as you just keep a few things on it, you can use these features for free!

Evernote

Evernote's motto is "Remember Everything" and that is exactly what this application is designed to do. You can capture your notes and ideas in any form that you can imagine and then access it on many different types of computer, mobile phone or device. On the Evernote for Mac/PC laptop or desktop version, you can save notes, store PDFs and store links to important web pages. As the introduction video says, the best part about this product is that your information is available everywhere - on you computer, mobile device and online. The desktop version will add an icon on your computer allowing you easy access and easy uploads. To save text from the web, copy it and push the icon. You can paste it directly to Evernote.

An interesting feature is that you can search title, tag or even handwritten/printed text in an image. This is not true with many different search engines.

You can download Evernote on your Mac/PC or get the free application for iPhone/iPad and Android. If you buy the premium version ($5/month or $45/year), you can search PDFs, upload up to 500 MB per month (the free amount is 40 MB/month), receive an added layer of security (SSL encryption) and upload virtually any file type to the application (think Microsoft Office documents, videos, etc...).

The mobile application is very similar to the desktop application, only much more streamlined. When you open the application, you can create a new note, view all notes, see your favorites or sync with other devices and the web. Notes can be in the form of text, picture/video or voice notes. Your notes are geotagged for even more help in remembering tasks. To save as a favorite, simply click the star next to the name of the note on each note.

I have heard of people using this application for everything - for remembering where you parked your car with a photo note to keeping a grocery list. This application is a lot like Dropbox in that you can store/share/sync files with multiple devices, only this one is aimed more at little notes, reminders and photos than serious file sharing, but you can do that too. The only improvement I would make to this application would be to make text out of my voice memos, like Dragon Dictation.

Thursday, November 4, 2010

PicPosterous

Posterous is a place to share, well, anything that you think is fit to share. You can upload photos, videos or files or anything that you see fit to share. There are many ways to upload to Posterous - through a mobile device, email or directly from the web. It is really easy and a really good way to create a low-maintenance photo blog of sorts. It is so accessible. That is the great thing about this application - whether you are on your mobile device, on a friend's computer or your own - you can update your Posterous account. Another cool feature is that you get to choose whatever name you want for your account. For instance, mine is jenniferelston.posterous.com, but if you have a developing business or another blog and want another outlet to share with your friends and fans, this is perfect. One successful example is imjustcreative.posterous.com/ for a logo/design blogger. Graham puts most everything that he would put on his website and tumblr account, but more importantly, everything else that wouldn't quite fit in.

The iPhone application is specifically designed to be a photo-sharing app. When you open the application, you are given the choice of taking a photo or video, or adding an existing one from your Library. You can create different albums on your phone of different people, groups or whatever you feel inclined to make. If you want to share the fun in different ways, you can change the settings so that PicPosterous automatically posts to twitter, Facebook or your existing blogs by visiting http://posterous.com/autopost.

I would recommend this application for anyone who loves to share every aspect of their lives. It is one step above TwitPic and Plixi because you get your own professional-looking website that features all of your favorite pictures/videos.

Wednesday, November 3, 2010

Camera Bag


CameraBag is an extremely easy to use photo application for the iPhone. It uses the built-in camera on the phone to take pictures, so you don’t need any extra equipment (although lenses and flashes wouldn’t hurt), and it’s pretty cheap to buy.

The specialty of this application is to put filters on the pictures you take. There are several different ones, although some, like color cross, I can’t see anybody using for professional reasons, and others look very much the same. But there are enough different, useful filters that this application deserves a download and a look.

CameraBag doesn’t require that you use the application to take the pictures, and in fact the application works better if you just take the pictures and put them on your camera roll. If you have it open when you’re shooting, each picture will open on the camera, and before you take another, you will have to click on the phone to open our camera back up. Instead, you can go out and take your pictures, then upload them to CameraBag.

Either way, once you have your picture, it’s a simple process of flicking the screen from side to side to see which filter works best for what you’re using. Helga has ended up being my favorite, but really the story would warrant the filter, if you use one at all. Once you’ve chosen, you just have to tap the save button and your picture will be saved to your camera roll, so that you can text, email or upload it like any other picture you take.

In all, the application is a pretty neat little deal. It’s certainly something you wouldn’t use every time you go into the field, but if you were working on a story that was a bit more featurey than normal, I could certainly see it coming in handy. If you do use it, it’s simple and quick, and getting the pictures off your phone is virtually effortless.